Part One: Log in with the Terminal and OpenSSH
Introduction
I’ve been a Linux user since 1999, but in 2020 I decided to make a MacBook my primary computer. Since my Linux box still had Terabytes of free hard drive space, it seemed logical to set it up as a file and Time Machine server for my Mac. This series of articles is about that process.
This first article is about setting up your Linux box so that you can connect remotely from your Mac. That’s where OpenSSH comes in. With OpenSSH you can use the Terminal on your Mac to connect to the Terminal on your Linux machine. Later in the series we’ll change the computer names, set up the firewall, set up file shares, set up Time Machine, configure SSH keys, and open the Gnome Desktop GUI in Linux on our Mac Desktop—but first things first.
I’m going to assume that you have a computer running a freshly installed copy of Ubuntu Linux 22.04 and a Macintosh running macOS 10.5 (Leopard) or newer. You should be able to adapt my advice to other versions of Linux—especially Debian-based distributions.
Connect Your Mac to Your Linux Box
In order for the Mac and the Linux box to find each other on the local network we need to use mDNS software. mDNS allows computers on a local network to exchange their names without a central name server (usually a DNS server). The mDNS software on the Mac is called Bonjour and on Linux it’s called Avahi. It should be pre-installed on both platforms.
Install OpenSSH in Linux to Allow your Mac to Log In
SSH stands for Secure Shell and it provides a way to log into a remote computer and transfer files. Linux and macOS use OpenSSH, which is an open source implementation of SSH.
Remote logins are disabled by default when you install Ubuntu 22.04, but we’re going to want to access our Ubuntu box from our Mac. To enable remote logins and remote file transfers let’s install OpenSSH.
Open a Terminal in Linux and install OpenSSH with the following command:
sudo apt install openssh-server
The apt program will make a list of packages that will be added, deleted, or otherwise altered in your system and ask you to type y or n to proceed. Type y or press Enter.
The system administrator in a Linux or Mac system has several names. Usually it is called the root account. It can also be called the "superuser" account. This account is so powerful that usually you won’t log in with it. In fact, for both Ubuntu and macOS logging in as root is disabled. This restriction keeps your system safer from hackers.
Some commands do require administrator privileges to run, however. The software installer apt is an example of one. When you need to run a command as root start the command with sudo (which stands for "superuser do"). The system will ask you to type your user password (never the root password).
Enable OpenSSH Server
You can turn on SSH logins with the following command:
sudo systemctl enable --now ssh
and should you ever want to turn off remote logins you can use the command
sudo systemctl disable --now ssh
Keep in mind that if you turn off remote logins from a remote login you’re going to get disconnected and you’ll have to go and sit at the actual Linux console to reenable them. I once disabled SSH logins on a remote computer in a different city and had to drive and be let into a building so that I could sit at the Linux console and reenable them. That’s a mistake you make only once (hopefully).
You can verify the status of your OpenSSH server with:
travis@server:/home/travis$ sudo systemctl status ssh
The output should be something like this:

At this point you can use the Terminal app on your Mac to log into the Terminal on your Linux box. The rest of this article assumes you’re on your Mac.
Log Into Your Linux Box from Your Mac
macOS comes with OpenSSH preinstalled, so there is nothing you need to do to use it. Simply open a Terminal and log in to your Linux system using the steps below.
First, you need to know the computer name of your Linux box. You would have specified this when you installed Linux.
If you forgot what you named your Linux computer, just open a Terminal in Linux and look at the prompt. It will be something like
travis@server:~$
In this case, my userid in Linux is travis and the name of the Linux computer is server. Compare this to the prompt in the Terminal in macOS, which will look something like this:
tcapener@Trav-MacBook ~ %
Here my user id is tcapener and my computer name is Trav-MacBook. There is no reason to have a different userid in macOS and Linux. In fact, things will be easier if you have the same userid in both places. In my case, my macOS userid has been tcapener for the last 21 years and I keep migrating my account from one Mac computer to the next.
If you don’t want to log back into your Linux box, you can find the name of it from your Mac. Use the following command in the Mac Terminal
arp -a
to list all the computers on your LAN. It will produce output like this
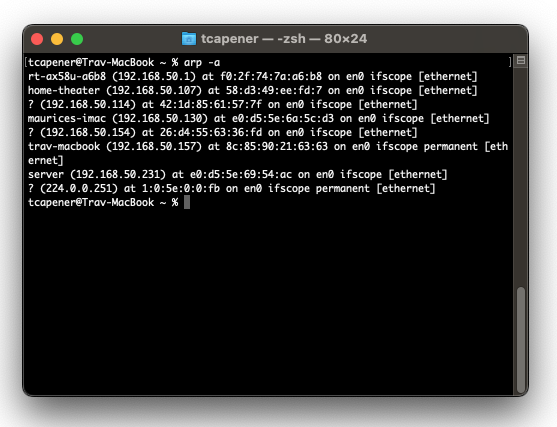
You can see whatever you called your Linux machine in the list and it will jog your memory (in this case it is server). When you refer to your Linux system on your Mac you will always append a .local onto the end of it. So server becomes server.local.
Now, let’s log into your Linux system. On the Mac, type the following (substitute your own Linux userid and computer name)
ssh travis@server.local
If it’s the first time you’ve logged in from this Mac you will see output similar to the following
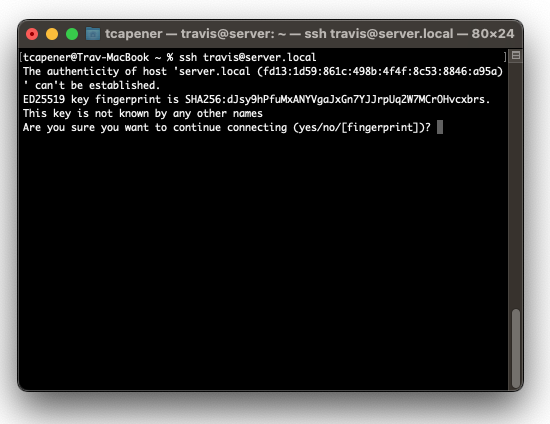
Whenever you log into a computer for the first time, OpenSSH will show you this message. You can type yes to verify that it’s okay to proceed. You shouldn’t see this message again after the first time you log in from the same Mac. If you do, it could be a sign that someone has re-installed the OS on the remote computer—or it could be that the remote computer is an imposter. If you’re logging into your own computer and see this message again (and you haven’t reinstalled Linux), then something is definitely wrong. Keep in mind you’ll see the message for every new Mac that you use to log into your server.
Once you type yes to continue, you’ll see more
Warning: Permanently added 'server.local' (ED25519) to the list of known hosts.
travis@server.local's password:
Now type in your password for the Linux system.

We can ignore the information about updates or any system restart for now. Now your Mac Terminal is actually displaying the Linux Terminal. The commands you type into this window will execute on the Linux box.
Enter Some Commands in Linux From Your Mac
Try entering some commands. Linux and macOS share many Terminal commands in common. The first command to know is exit which logs you out of the current shell. When you log out of Linux you’ll find yourself back in macOS.
travis@server:~$ exit
logout
Connection to server.local closed.
tcapener@Trav-MacBook ~ %
Remember you can log back into Linux from your Mac with OpenSSH (substitute your own user id and computer name).
ssh travis@server.local
You can also remotely reboot your Linux box. This will log you out automatically. For such a drastic command you need to indicate that you’re doing it as the "superuser" with sudo.
travis@server:~$ sudo reboot
You will be asked to type in your user password.
[sudo] password for travis:
Connection to server.local closed by remote host.
Connection to server.local closed.
tcapener@Trav-MacBook ~ %
When you log out of the Linux system, you’ll find yourself back in your Mac Terminal. You can tell because the command prompt has changed to
tcapener@Trav-MacBook ~ %
(with your account name and computer name).
It will take your Linux system a few minutes to reboot before you’ll be able to log back in again.
If you want to log back into Linux, here are a few basic commands to get you started. You can find out how long your system has been running since the last reboot with the uptime command.
travis@server:~$ uptime
07:08:54 up 11 days, 14:44,  1 user,  load average: 0.02, 0.02, 0.00
travis@server:~$
You can get an overview of what your computer is doing with the top command.
travis@server:~$ top
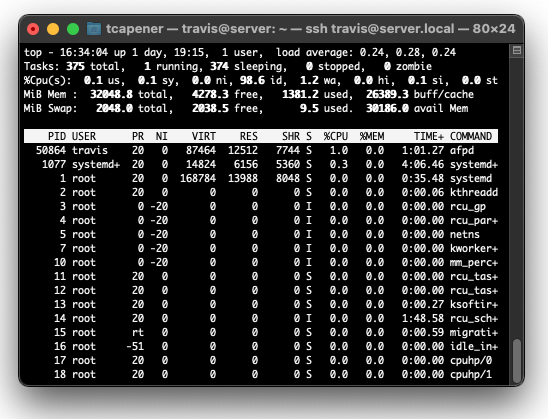
top displays a continuous update of your computer’s CPU usage, memory, and running processes. Type "q" to quit.
You can get a summary of free disk space using the df command.
travis@server:~$ df -h
Filesystem      Size  Used Avail Use% Mounted on
tmpfs           3.2G  2.4M  3.2G   1% /run
/dev/sdd1       469G   17G  429G   4% /
tmpfs            16G     0   16G   0% /dev/shm
tmpfs           5.0M  8.0K  5.0M   1% /run/lock
tmpfs           3.2G   76K  3.2G   1% /run/user/127
/dev/sde         15T   19G   14T   1% /mnt/MegaBox
tmpfs           3.2G   68K  3.2G   1% /run/user/1000
travis@server:~$
The -h switch tells the program to display the results in "human readable" form.
Security Considerations
Once you’ve enabled SSH logins to your Linux machine you should seriously consider turning on the firewall. I want to write a whole article on this topic, but here is how you can configure your firewall to only allow SSH logins from your local network.
sudo ufw default deny incoming
sudo ufw default allow outgoing

# allow SSH only from local network
sudo ufw allow from 192.168.0.0/16 to any port 22

# Enable firewall
sudo ufw enable
If you need to, you can also disable the firewall
sudo ufw disable
Conclusion
Now you can log into your Linux box from your Mac. At this point, I put my Linux machine in my spare room and disconnected the keyboard and monitor. Whenever I need to work on it now, I log in from my MacBook from my normal workspace.
In the next articles in this series we’ll cover setting up file shares and the Time Machine, more security, and logging into the Gnome desktop GUI.
The Happy Path to Install OpenSSH in Ubuntu
In a Linux Terminal, type the following.
sudo apt install openssh-server
sudo systemctl enable --now ssh

sudo ufw default deny incoming
sudo ufw default allow outgoing
sudo ufw allow from 192.168.0.0/16 to any port 22
sudo ufw enable

ssh travis@server.local
exit

Leave a comment